

Copilot Tips and Features: Copilot for Excel – Tech Tip for Feb 20, 2024
Welcome to this week’s Tech Tip. Copilot in Excel works with complex data: numbers, statistics, formulas, and more. This Copilot will not be accessible without a few steps being taken, but once the Copilot button is enabled, it can help you sort and filter data, bold table columns, and convert content into tables and charts. The Copilot in Excel experience can also help you quickly create formulas, explain how formulas work, and help you use them. Let’s get started!
Microsoft Excel Copilot Experience

Use Copilot Example Data in a Blank Workbook:
- ‘Open’ and ‘Save’ a new ‘Blank workbook’ in the Cloud.
- ‘Copilot’ icon/button should be enabled (green) after the Blank workbook is saved.
- Click ‘Copilot’ button from the ribbon.
- Select ‘Try an example’ button to allow Copilot to create an example table.
- Copilot will generate an example table.
- Use Copilot example use prompts to get started or try your own!

TIP: Use concise and clear language when prompting. As with any AI-generated content, it’s important to review, edit, and verify anything Copilot creates for you.
Access Copilot in an Existing Workbook:
- Open Excel workbook with existing content.
- Select ‘File’ tab, and ‘Open’ to navigate to and open a pre-saved workbook.
- Select ‘Copilot’ icon/button from the ribbon to open the chat pane.
- With Copilot open: click into a table cell with data or highlight a single table with data.
- Copilot may request to convert existing table content (see Convert Data to a Table).
- Enter natural language in the prompt area to begin!
- Click Copilot ‘Refresh’ button above prompt area to request more example prompts.
- Click the ‘Stars’ button in the prompt area (bottom left) to access more example prompts and uses from the ‘Prompt Guide.’
TIP: Copilot chat dialog will let you know if more data is necessary, or Copilot chat response will include “Sorry, I can’t do that right now. Try again or select a suggestion.”
Create an Excel Table from Data:
- Click in a cell and drag cursor to highlight all data (including column headers).
- Select ‘Insert’ tab from ribbon menu and click ‘Table’ button.
- You may also use ‘CTRL+T’ keyboard shortcut to create table from data.
- ‘Create Table’ pop-up will appear. Select ‘OK’ button to Create Table. Ensure that ‘My table has headers’ is selected.
Convert Data Range into a Table:
- Copy and paste (‘CTRL+C’ and ‘CTRL+V’) data or content into an Excel workbook.
- Click to highlight a data table, or click to select a single table cell, where data is present.
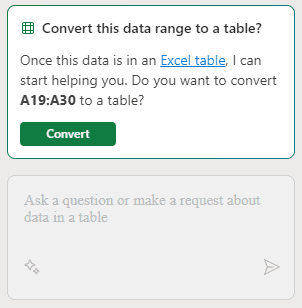
- Copilot will prompt you to ‘Convert this data range to a table.’
- Only after data is converted to valid table format, will Copilot offer prompt examples and allow for further dialog regarding data.
TIP: Copilot in Excel can only be used with Excel files (.xlsx or .xslm) saved to OneDrive or Microsoft 365 SharePoint locations with AutoSave turned on.
TIP: The Copilot button is not active while editing files saved in locations on your computer or saved as unsupported file types. If you can’t select the Copilot button in the ribbon, try saving the file to the cloud first.
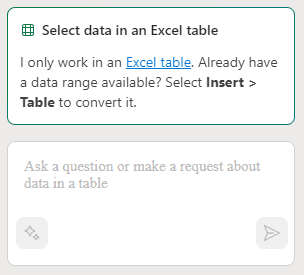
TIP: If cell is empty or data requires further formatting for Copilot to work with it, “Select data in an Excel table,” prompt will be present from Copilot with instructions to convert data into table format.
Explore Copilot Feature Prompts
Copilot offers default options to help you discover more ways to work with your data. If Copilot’s default options appear disabled (grayed-back), you may need to Convert Data for Copilot to use (see above). Once data is converted into a valid format for Copilot, default options should appear enabled. Let’s explore the Copilot in Excel options and their various functions, below.
- Add formula columns: Allow Copilot to add new columns or formulas. Try an example prompt.
- Highlight: Use this feature to help highlight data, example, “Bold the first column.”
- Sort and filter: Organize your data more effectively. Sort columns in ascending or descending order or narrow data results by using the filter function (prompt using table headers to filter by).
- Analyze: Show insights. Use this feature to describe what you would like to know about your data. Choose a suggested Copilot prompt or ask a question using natural language.
Formulas with Copilot in Excel
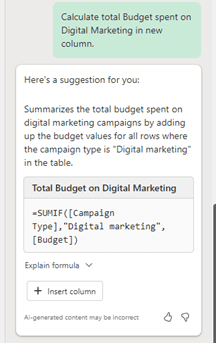
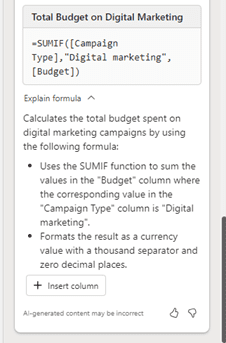
Copilot acts as your assistant to help create new formulas in Excel. Prompts should be very specific and concise when prompting Copilot to create formulas that refer directly to table data. Try a prompt when using Copilot’s ‘example table’ content, “Calculate total budget spent on digital marketing in new column.” Copilot will suggest a formula for the action, explain the formula, and add it for you.
- Click ‘+ Insert column’ button to instruct Copilot to add new column data.
- Click ‘Undo’ button to undo the action if data is insufficient.
Try these prompts:
- “Calculate total cost per product in a new column.”
- “Add a column that calculates total profit for each marketing campaign in 2023.”
- “Add a column that calculates number of days after product launch event.”
TIP: When ‘Undo’ button is selected within a generated result, Copilot will add a strikethrough on the previous prompt to denote unsatisfactory results.
Be sure to follow along with us in our Copilot series to hear more about Microsoft Copilot for Microsoft 365 apps.
Reach Out to TechWise Group
Interested in learning more about Copilot? Reach out to TechWise Group. We’ll help you make the most of your Microsoft tools.
Important Microsoft Announcements:
- If you have not already moved to NCE licensing for your organization or if you have any questions about upcoming renewals, please contact us at gettechwise@techwisegroup.com to understand your options.
- MFA is the best way to prevent cyberthreats. If you have not enabled MFA in your organization, let us help you put a plan in place.
- Windows Server 2012 and 2012 R2 Extended Support ended on October 10, 2023. If your organization is still running these operating systems, please contact us to discuss your options.
- Microsoft expands Copilot licensing for small-to-medium businesses (January 15, 2024). Reach out to TechWise Group to discuss your options.
- April 1, 2024, Microsoft announced global changes to Teams licensing. Please reach out to TechWise Group with any questions.
- Classic Teams client reaches end of availability. Microsoft extends time to July 01, 2024, for Admins to address any related issues.
- July 9, 2024, marks the end of support (EOS), for SQL Server 2014. Please reach out to TechWise Group to explore your options.
- Windows 10 reaches the end of support on October 14, 2025. Please contact us to discuss your options.