
Excel Tips and Features: Define Data with Python – Tech Tip for November 19, 2024
In this week’s Tech Tip, we explore more tools and simple coding methods for working with Python in Excel. Discover how you can effortlessly view and receive immediate defined and descriptive data results from your spreadsheets with powerful Python functions, making data analysis simple and efficient. Let’s dive in!
Insert Python in Excel
Open an existing Excel workbook with data. Or, review our previous Tech Tips to create data with Copilot in Excel if you require assistance creating sample data.
- Within an Excel workbook with data, select a clear cell on your Sheet.
- From the Excel menu ribbon: select the ‘Formulas’ tab and click ‘Insert Python.’
- Alternatively, type “=PY” in the Formula bar, and select ‘Tab’ on your keyboard.
- Python will now show as active in the Formula bar and cell.

Define a DataFrame
A Python DataFrame is a two-dimensional, tabular data structure. Similar to tables in a SQL database or spreadsheets in Excel, it has labeled rows and columns, and can be used for data manipulation tasks, such as filtering, grouping, or aggregating data. It can also work with dataset formats such as CSV files, databases, Excel spreadsheets, and JSON.
Let’s define our Python DataFrame:
- With Python active in the Formula bar, type “df=” (‘dataframe equals’).
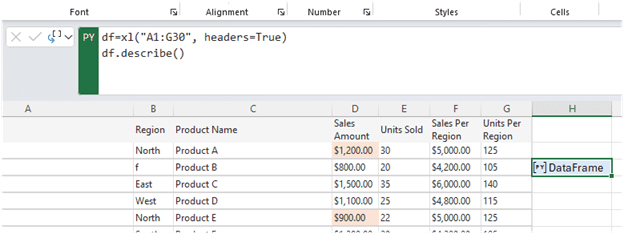
- Click to select and drag your cursor to highlight and define your table cell data.
- After selecting your data cells, click your cursor back into the Formula bar, and select ‘CTRL’ + ‘Enter’ to commit your Python code.
- In our example, our highlighted cell data includes cells ‘A1’ through ‘G30.’
- Our Python code should therefore reflect as: “df=xl(“A1:G30”, headers=True)”
- The code references the Excel data we defined in the Python code using ‘xl()’.
- The code also recognizes the ‘headers’ at the top of our columns using “headers=True” format, each descriptor separated by using a ‘comma space.’

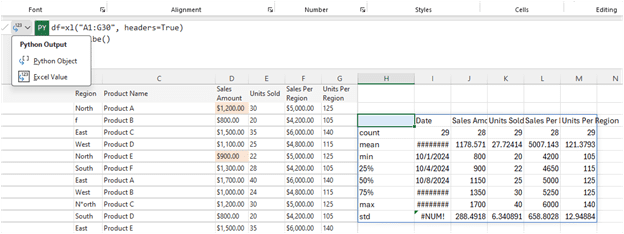
TIP: Switch your view (to the left of the Formula bar) to see your data as an ‘Excel Value.’ When you are ready, switch the view back to ‘Python Object []’ and continue coding in the Formula bar.
Describe the Data
In the following example, we use an ‘accessor.’ This is a ‘getter’ or a method to retrieve an ‘object’ using Python code. Let’s use the ‘Describe’ method to work with sample table data in Excel to receive a return analysis in response to our query. This method can be a quick and easy way to analyze (or describe) your selected data.
- Place cursor into the Formula bar in Excel.
- Select ‘Enter’ to start a new line below the previous dataframe line of code.
- Type: “describe()” which will describe the dataframe and Excel data (‘xl()’) that is defined on the line above using the accessor ‘.describe’ method.
- Select: ‘CTRL’ + ‘Enter’ in the Formula bar to commit your Python code.
- Switch view from ‘Python Object’ to ‘Excel Value’ to view ‘.describe’ results.
- Switch view back to ‘Python Object’ to continue coding.


TIP: Avoid spaces in header columns to simplify your data whenever working with Python code. If you do need to refer to a specific ‘header column,’ refer to it in a dataframe using square brackets before the accessor using quotation marks, ex. “df[“column 1”].describe()”.
TIP: For analyzing multiple header column values that have spaces, ex. ‘Sales Amount,’ enclose the Data Frame using both additional parentheses to enclose the dataframe and accessor and additional opening and closing square brackets before and after the quoted column names, ex. “(df[[“column 1”, “column 2”, “column 3”]].describe())”.
By integrating Excel tools like Python in Excel, you can leverage its powerful libraries and functions to gain deeper insights and streamline your workflow. We hope that you’ll give this Python in Excel code example a try!
Reach Out to TechWise Group
Interested in learning more about Excel, Python in Excel, and Copilot features? Reach out to TechWise Group. We’ll help you make the most of your Microsoft tools.
Important Microsoft Announcements:
- Maximize your organization’s Security with Secure Score and MFA:
- Get to know your Secure Score—your essential tool for proactive threat management.
- Enabling Multi-Factor Authentication (MFA) is the best way to prevent cyberthreats.
- Give your business a productivity boost with Microsoft Copilot:
- Get started with Copilot consulting services to organize and secure your data, while also training you and your team.
- Keep your infrastructure up to date:
- Windows 10 reaches End of Support (EOS) on October 14, 2025.
- Windows 11 feature update 24H2 is now broadly available (January 2025).
- Windows 11 version 22H2 Home and Pro editions will reach end of service (October 8, 2024) and will be required to upgrade to version 23H2 to continue receiving security updates.
- Windows 11 Enterprise and Education editions with 22H2 will continue to be supported after October 8, 2024.
- Contact TechWise Group to get started or to put a plan in place.