The Start Menu is the place to find all your apps and programs. The Windows 10 Creators Update allows you to personalize your Start screen to show you the apps, tiles, a nd layout you need to be your most productive self.
Select the Start ![]() button, and then Settings > Personalization > Start to tinker with your Start screen and make it yours by pinning apps and programs, or moving and regrouping tiles. If you need more space, you are now able to resize your Start menu.
button, and then Settings > Personalization > Start to tinker with your Start screen and make it yours by pinning apps and programs, or moving and regrouping tiles. If you need more space, you are now able to resize your Start menu.
Your apps and programs—right at your fingertips
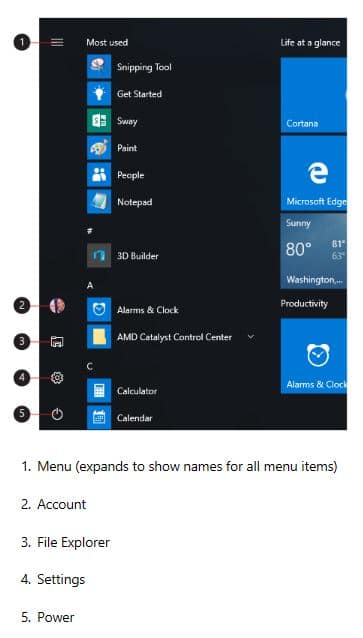
Open File Explorer, Settings, and other apps you use often from the left side of the Start menu. Scroll down the app list to see all apps and programs alphabetically.
You have the power
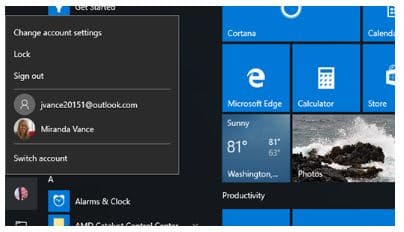
Lock or sign out of your PC, switch to another account, or change your account picture by selecting your picture (or the Accounts icon, if you haven’t added a personal picture) on the left of the Start menu.
When you’re ready to step away for a while, the power button is always available at the bottom of the Start menu to make your PC sleep, restart, or shut down completely.
To make other changes to how the Start menu looks, select the Start ![]() button, then select Settings > Personalization > Start to change which apps and folders appear in the Start menu.
button, then select Settings > Personalization > Start to change which apps and folders appear in the Start menu.
Pin and resize apps in the Start Menu
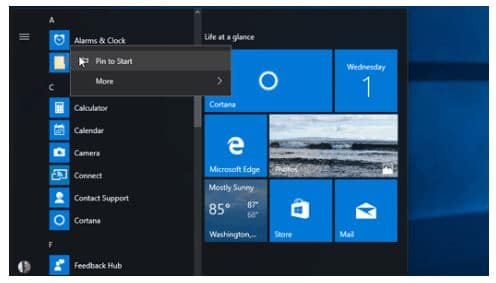
 Pin apps to the Start menu to see live updates on what’s happening in your world—such as new email, your next appointment, or the weekend weather. When you pin an app, it’s added to the Start menu as a new tile. The steps are very simple:
1. Select the Start ![]() button, then press and hold (or right-click) the app you want to pin.
button, then press and hold (or right-click) the app you want to pin.
2. Select Pin to Start.
Once you pin a new app, resize it. Press and hold (or right-click) the app tile, select Resize, and then choose the tile size you want.
Tip 1: You can also drag and drop apps from the apps list to pin them to the Start menu as tiles!
Resize your entire Start menu
To make Start full screen and see everything in one view, select the Start ![]() button, then select Settings > Personalization > Start, and then turn on Use Start full screen. The next time you open Start, the Start screen will fill the entire desktop. Select All apps for a full-screen view of all your apps and programs, or stick with Pinned tiles for a more dynamic view. If you just want resize the Start menu a bit to make it taller or wider, select the top or side border and drag it.
button, then select Settings > Personalization > Start, and then turn on Use Start full screen. The next time you open Start, the Start screen will fill the entire desktop. Select All apps for a full-screen view of all your apps and programs, or stick with Pinned tiles for a more dynamic view. If you just want resize the Start menu a bit to make it taller or wider, select the top or side border and drag it.
Sort and group your apps
To create a new group of tiles, move an app’s tile up or down until a group divider appears, and then release the tile. Move apps in or out of the group to organize your tiles for perfect productivity. To give your new group a name, select the open space above your new group and type a name.
Was this Tech Tip helpful? Please let us know by filling out our tiny survey!
