
Tips & Shortcuts in Excel (Part 2)
This Tech Tip is all about navigating through Excel. Keep reading to learn how to navigate quickly, easily, and efficiently in order to increase your productivity.
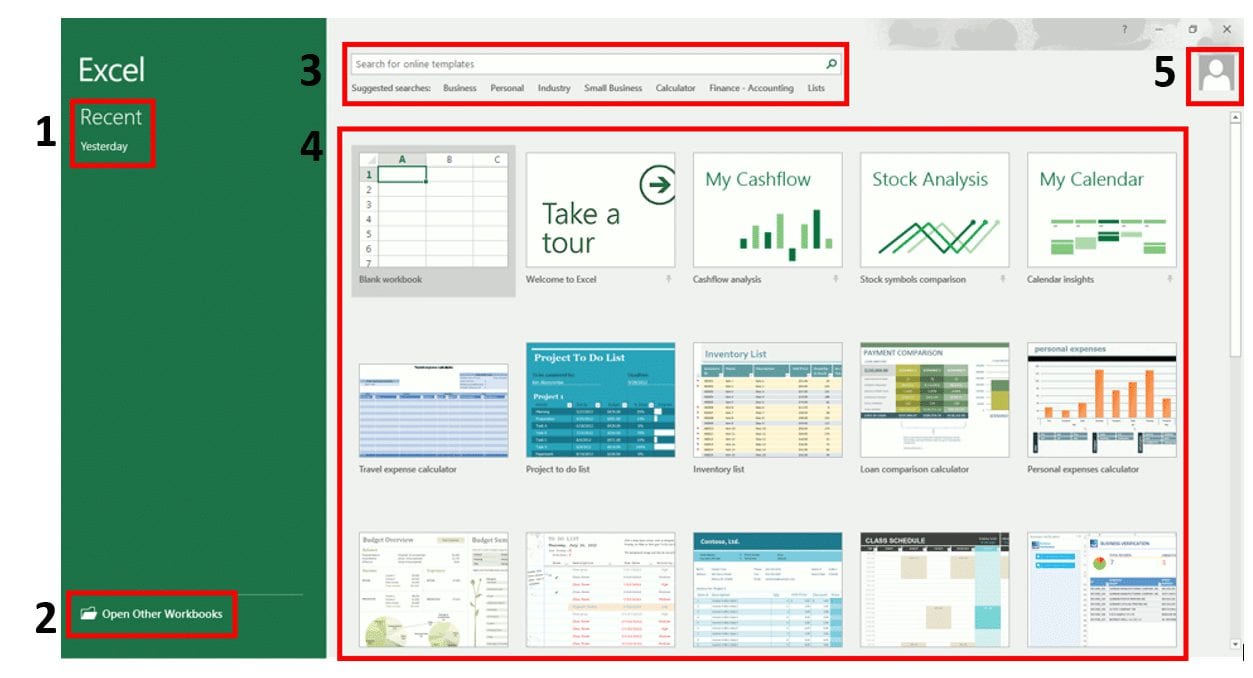
Navigating the Start Screen
The Start screen provides quick access to your most recently used workbooks, or allows you to open other workbooks from your local or cloud storage. You will also have instant access to various Excel templates, as well as the ability to search online for other templates that can help you start a new project quickly.
Navigating the Start screen
- Box 1 & 2 – The Start screen provides quick-access to your most recently used workbooks, or lets you open other workbooks from your local or cloud storage.
- Box 3 & 4 – You will also have instant access to various Excel templates, or have the ability to search online for other templates that can help you start a new project quickly (not all templates are shown above).
- Box 5 – You can even sign in or switch Office 365 accounts from here.
Templates do most of the set-up and design work for you, so you can focus on your data. Excel 2016 includes nearly 30 templates for budgets, calendars, forms, reports, and more. Additionally, you can find more templates online.
(Notes: The Start screen showing recent files and templates is enabled by default. To disable the Start screen navigate to the “File tab (Backstage) > Options > General tab”, and uncheck the option at the bottom of the pop-up box for “Show the Start screen when this application starts”.)
Navigating the Excel Ribbon and Contextual Tabs

The Excel Ribbon makes finding things faster and easier by grouping controls together by their functionality on contextual tabs. You can adjust the settings so that they will only appear when you need them, which eliminates the need for multiple rows of toolbars.
Examples of how to manage the ribbon
Minimize the ribbon to gain back some screen space:
- To quickly go back and forth between un-collapsed and collapsed, simply double-click (instead of single-clicking) a tab on the ribbon.
- Or, collapse the ribbon by right-clicking a tab and clicking “Collapse the Ribbon”.
- If you want the ribbon to always stay visible, simply drop one of the tabs down and then click the little pin on the bottom of the right side of the ribbon to “pin it in place”.
Use the keyboard to work with the ribbon:
- Press and release the ALT key.
- You see the little boxes called Key Tips over each command available in the current view.
Customize the ribbon in Office:
- You can personalize your ribbon to arrange tabs and commands in the order you want them, hide or unhide your ribbon, and hide those commands you use less often.
- You can add custom tabs or rename and change the order of the default tabs that are built in.
(Notes: Your ribbon customizations only apply to the Office program you’re working in at the time and no other Office application, such as Word or PowerPoint, will be affected)
Navigating worksheets quickly with the Ctrl and directional keys
Jump to a worksheet’s edge using the Ctrl and matching arrow key, in the direction of the arrow. Navigate across worksheet tabs using Ctrl + the PgUp or PgDn keys.
Examples of quick navigation…
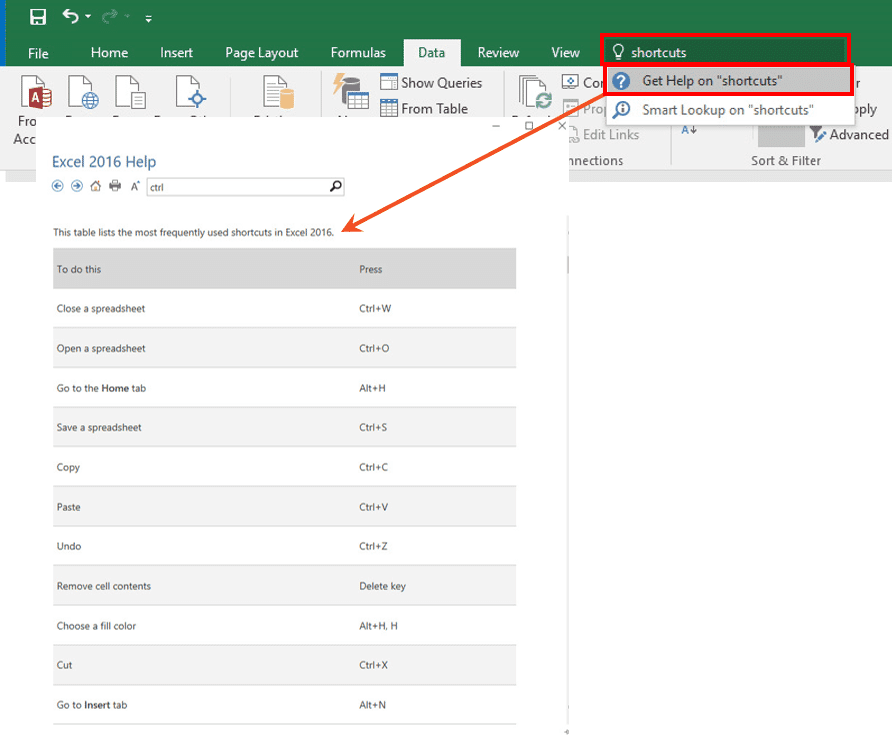
To see the various shortcut lists using the “Help” option:
- Start typing “shortcuts” in the Tell Me box.
- Then, click Get Help on “shortcuts”.
- Then, click on Keyboard shortcuts in Excel 2016 for Windows (screen not shown).
- Then, chose whichever shortcut list you are most interested in.
Jumping around within worksheets
- If you want to jump to the top of your worksheet, press Ctrl + the arrow key pointing up.
- To jump to the bottom, use the down arrow key; to the left, the left arrow key; and to the right, the right arrow key.
- To switch between worksheet tabs from left to right, press CTRL+PgUp; to switch between worksheet tabs from right to left, press CTRL+PgDn.

Our Free Microsoft Office 365 Hands-On Workshops are back!
Join us for our Free Microsoft Office 365 Hands-On Workshops at our Main Office (441 E Hector Street, 3rd Floor, Conshohocken, PA 19428), where we offer you a hands-on environment in which you can test-drive best-in-class Microsoft technologies, including Windows 10, Office 365, Skype for Business, SharePoint, OneDrive, and more – all while working on the newest and coolest Windows devices.
Click here to learn more and sign up.