
New features in Microsoft Office 365 – Morph your Slides in PowerPoint!
This month we have been sharing some fantastic new features that Microsoft has rolled out for Office 365. Most of which enhance the ways that you can communicate and collaborate with others. Microsoft has stepped it up even more with the Morph transition tool in PowerPoint which allows you to animate smooth movement from one slide to the next! You can apply the Morph transition to slides to create the appearance of movement in a wide range of things including text, shapes, pictures, SmartArt graphics, WordArt, and charts.
To use the Morph transition effectively, you’ll need to have two slides with at least one object in common. The easiest way is to duplicate the slide and then move the object on the second slide to a different place, or copy and paste the object from one slide and add it to the next. You would then apply the Morph transition to the second slide to see what Morph can do to automatically animate and move your object. Here’s how:
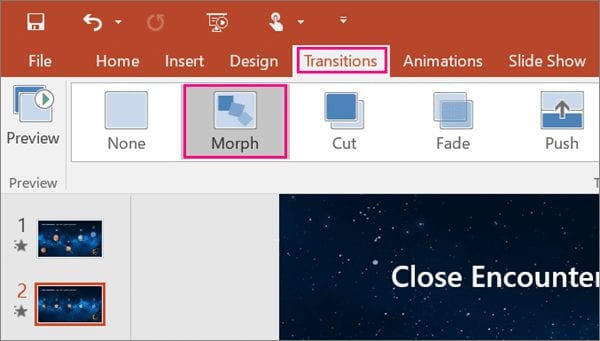
- In the Thumbnail pane on the left side, click the slide that you want to apply a transition to, which should be the second slide you added the object, picture, or words you’d like to apply the morph effect to.
- Click the Transitions tab, select Morph.

Note: In PowerPoint for Android, select Transitions > Transition Effects > Morph.
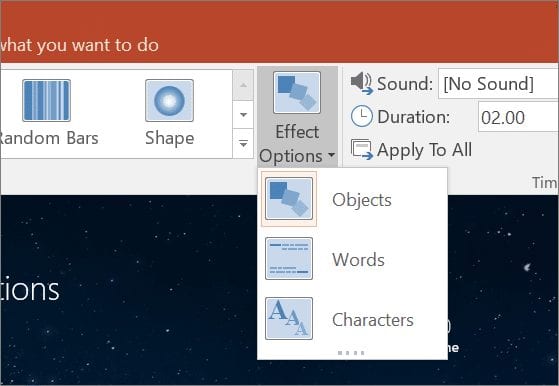
- Select Transitions > Effect Options to choose just how you’d like the Morph transition to work.

- Click Preview to see the Morph transition in action.

This is the second slide with the same objects after the Morph transition has been applied. The planets moved without needing individual motion paths or animations to be applied to them.

TechWise Group is happy to walk you through Office 365 migration and deployment. Click here to get started! Stay tuned this month as we fill you in on all the amazing, user-friendly features that are now available in the Office 365 Suite!
Countdown to Windows 7 End of Extended support